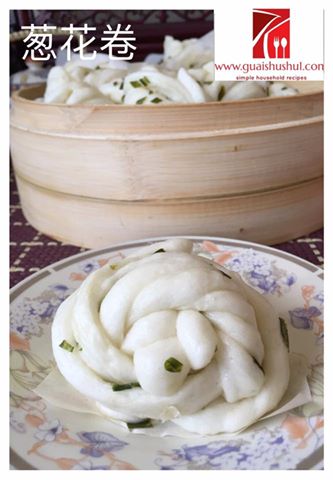
Time To Cleanse Your Body After Chinese New Year Feast–Flower Buns (花卷)

Updated post on 3-11-2014
Decided to prepare some of the flower buns today. They are no major changes in the recipe except that I have added 2 tablespoons of castor sugar to make it slightly sweeter so that I need nothing to go with it. In addition, I have change it to another variant – spring onion flower buns which is rather common in China.

With the left over dough, I prepared some mantou using the same recipe. If you are interested in making quick and easy mantou, you can also refer to this post: Chinese Steamed Bread–Mantou (刀切馒头)

Do not admire me for the shape of the flower buns. This is rather easy since it is with only one colour. No matter how you twist will come out some beautiful patterns. I am sure all will be able to do it.

INTRODUCTION
I have this post with me for a long long time. Due to Chinese New Year, I did not have a chance to issue the post. This is a simple post. It is a type of Chinese steamed buns and if you bake it, i will become western breads or buns. Is it not food relationships interesting?

It is just a yeasted bun like bread, but it is steamed. It is very easy to prepare but it need a bit of time to prove the dough. As for the shape, if it is round shape without any flavour, it become “man tou” . If you use these dough to wrap some fillings like Chinese barbecue pork or other types red bean fillings, it will become what is called “pao”. If you twisted it like what I am going to share in this post, it is called “flower buns” (花卷)。 These are essentially the same thing.

A healthy breakfast or snack items as can be inferred from its simple ingredients wheat flour, yeast, minimal sugar and minimal amount of oil.. When I travelled to Northern part of China, it is one of the common breakfast items usually served with very watery porridge or soya bean milk. Unlike most ladies, I love carbohydrates. I especially loved those yeast flavour wheat flour… I can always eat it plain without any thing. Of course, in the context of Singapore and Malaysia, you can eat it with coconut jam, butter or anything other jams that you like. You can even eat it with braised meat…

Before I proceed. I have to tell you my flower buns is very ugly..pardon me for this….Ha-ha

WHAT IS REQUIRED
Recipe adapted from : 家常花卷的做法

-
500 grams plain flour
-
6 grams of instant yeast or 12 grams of fresh compressed yeast
-
5 grams of salt
-
230 grams of lukewarm fresh milk or water
-
15 grams of milk powder (optional)
-
2 tablespoons of castor sugar
-
2 teaspoons of pandan paste (optional)
-
20 grams of cooking oil (for dough)
-
Additional cooking oil to spread on the dough (you can also use garlic oil if you want some fragrance or even melted butter)

STEPS OF PREPARATION
-
Get ready a steamer with boiling water.
-
Cut about 30 pieces of 6cm x 6cm water proof paper for placing the flower buns.

-
If you are using freshly compressed yeast, put in some water (2-3 tablespoon) on the yeast and let it rest for about 5 minutes. If there are bubbles coming out, your yeast is performing or alive and proceed to the next step. Otherwise, your yeast is dead. Generally, there is no need to do this for instant yeast. However, if you wish, you can perform the same as an additional measure.
-
In a big bowl, put all the dry ingredients (plain flour, sugar, salt and milk powder), make a well and add in the liquid ingredient (milk, pandan paste, water and yeast solution). You can either use hand or stand mixer to mix.
-
If you are using a mixer, use slow speed to mix for 2-3 minutes until it form a sticky dough. Thereafter beat at high speed for 15-20 minutes until the dough is not sticky and the wall the mixing bowl is cleaned of any sticky dough. If it refused to form a dough, add plain flour 1 tablespoon by 1 tablespoon until it is smooth. If it is too dry, add 1 tablespoon of water until a dough is form. (All flour have slightly different water absorbing properties, therefore, it is okay to add flour or water during the process and error tolerances are rather high)..

-
Transfer the dough into a flat surface dusting with some flour. Use hand to knead for 1-2 minutes until smooth. Use a rolling pin to roll it into a flat piece with about 0.3 mm thick.. Use a brush to brush some cooking oil/garlic oil/melted butter on top of the dough (the aim is to prevent the dough stick together in the next step). Use a knife to cut dough into long strips. Take 2 strips, seal the ends of the 2 strips (but not the body).

-
Twist the two stripes until it form the shape as in the diagram. Seal both ends and so that the dough become into one and put the sealing end on top of a piece of water proof paper on the steamer plate. (Shaping is up to your own creativities and there is no fixed and fast rule for this step. If you don’t like the shaping, just roll it and it become your style).
-
Let it proof for 30-45 minutes or until the flower buns double in size. In this process, you can feel that the buns become much lighter than it was originally prepared. This means air were incorporated into the dough and fermentation is in the process.

-
Once ready, steam in the steamer for 15-20 minutes. Off the heat and let the buns sit in the steamer for at least 5 minutes before you open the lid. Before the steaming, you have to ensure that the steamers have adequate water for steaming 15 minutes at high heat.

Spring Onion Flower Buns
-
After rolling the dough to a flat piece of about 3 mm thickness, spread cooking oil on the dough followed by sprinkle some chopped spring onion (and sesame seeds if preferred). Fold one third of the dough on the left side to the centre follow by folding one third of the dough in the right hand side to the centre. Brush additional cooking oil on top of the dough. Cut the dough into thin strips and please follow the instruction as above for the twisting, proofing and steaming.

CONCLUSION
If you read the post carefully, you will note that I have by passed a step. I did not do double proofing. Theoretically, the shaping will be done after the first proofing of 45 minutes, thereafter shaping, proof for another 25 minutes. For me, I have by passed this step because I found that the texture will not differ much and to save some time, I opt not to perform this step.

Do try this simple recipe. If you can’t visualize the taste, just imagine you are having some mantou (plain Chinese buns) or pao skin. It is definitely a healthy breakfast alternative. There are many variations, instead of spread the dough with plain cooking oil, you can spread with melted butter or garlic oil, it will become very fragrant.
Hope you like the post today. Cheers and have a nice day.

-
For more recipes, you can refer to my RECIPE INDEX (updated as at 15 October 2014) here and you can follow me at PINTEREST or visit the blog’s FACEBOOK PAGE to keep abreast of my future posts.
-
If you are a Pinterest user and you are interested to have more recipes, you can join or follow this Pinterest Board set up by me where there are more than 2600 recipes worldwide and pinned by various bloggers: FOOD BLOGGERS AND FOODIES UNITED PINTEREST BOARD.

Share this:

Comments are closed
Interesting! I love them. I bet they taste great!
They taste like steamed breads .
What a fun bun! I’m glad you mentioned you skipped a step with the second proofing – and that you didn’t notice any real difference without it. Pinned!
I love the green coloring. These look so fun!
G’day! These look great Kenneth and are on the list now to do!
Thanks for sharing!
Viewed as part of the Foodie Friends Friday Valentine’s Day Party!
Cheers! Joanne
Interesting that they are green coloured 🙂 Thanks for sharing these on Foodie Friends Friday Valentine’s Party and I hope you will join us for our Snack Food theme party this week.
I like these very much and I am glad you didn’t double proof. The shape is so nice as well, didn’t know you get that from twisting 2 strips of dough together.
I just love your site! Several muffins I plan to try. Would you share where you purchase the muffins cups shown in the most of the pictures.
Also, you mentioned coconut jam.Do you have a recipe for this you would share?
Phoon Huat. Coconut jam is kaya