
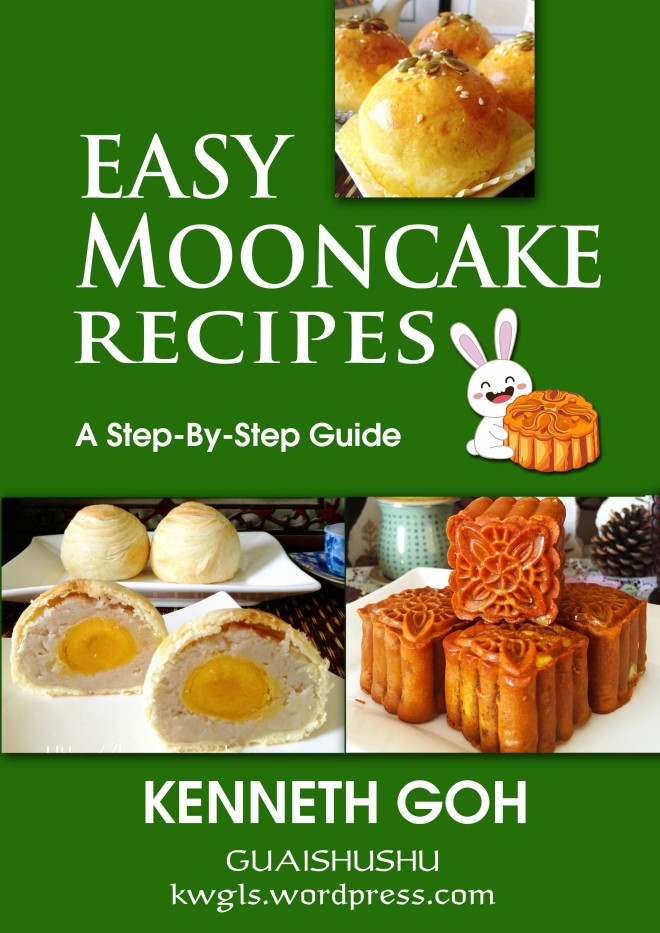
What About Some Poisonous Toadstool Moon Cake? One Bite Size Snow Skin Moon Cake

INTRODUCTION
I was angry because one of my old book shelf somehow collapsed this morning. While I am cleaning the mess, a 2005 magazine caught my attention! It was a August/September 2005 issue of Singapore Chinese magazine called Gourmet Living. In that issue, there are 3 moon cake recipes which were very creative and can be prepared without the need of using a mould. In fact I do not know that it is a moon cake until I read the contents. After I read the recipe, I have decided to toy with the idea by “creating” the toadstool moon cake using my own recipe.
 Picture source: August/September 2005 Gourmet Living Page 45-47.
Look at the moon cake, is it not beautiful without the traditional moulding? The recipe provider is a young lady chef named Judy Koh who was then the culinary consultant, chef and principal of Creative Culinaire. Her shaping is definitely more professional and I hope you can join me to replicate what she made using Guaishushu’s house dad poor baking skills. Ha-ha.
WHAT IS REQUIRED
Recipe adopted from Judy Koh of Creative Culinaire

-
50 g cooked glutinous rice (kaofen) 糕粉
-
50 g plain flour or Hong Kong flour
-
15 g vegetable shortening
-
150 g of golden syrup
-
Some permitted red colouring
-
240 g of moon cake fillings of your choice (depending on what you are going to make, if you just want to prepare one bite size moon cake without the stem, the moon cake fillings required will only be about 180 g)
The dough quantity and the moon cake fillings are estimated. You may want to consider have some extra to account some wastages.

STEPS OF PREPARATION

-
Bake the plain flour/Hong Kong flour in a metal bowl at 120 degree Celsius for about 20 minutes. Cool and set aside. In between, stir the flour to ensure consistent baking.
-
Sift our baked plain flour and cooked glutinous rice, add in golden syrup, vegetable shortening and stirred until well mixed. Let it rest for at least 30 minutes before wrapping.

I have to apologize my picture is incomplete as I have no body to help me to take all the picture! My hand was full of dough and rather inconvenience to take the picture.
-
Divide you moon cake fillings into 12 balls with each ball equivalent to approximately 15 grams each. Set aside. Leave the remaining dough for making the stem.
-
For your snow skin dough, set aside about 200 grams of dough and keep the rest of dough for making the stem.
-
Making the stem. Take about 10 grams of the moon cake fillings and shaped it in a cylindrical shape. Take 10 grams of the dough (of if you are not confidence, you can have 15 grams) and roll it into a flat thin piece. Place your moon cake fillings on top of the dough and wrap it round the moon cake filling. Insert a tooth pick in the centre. Do the same to the remaining 11 pieces and set aside.

-
For your 200 grams dough, put some permitted red colouring, knead and all the colour are even.
-
Use a rolling pin to flatten it until a big piece of about 0.5 cm tall. Take some original colour dough, roll it into a very small string, cut and place on top of the red dough. Use the rolling pin to flatten again and you will see the red dough with white Pokka dots.

-
Use a cup or some round shape cutter to cut the dough. Take a piece and wrapped around the moon cake fillings. Take the wrapped moon cake and placed on top of stem that were made earlier.

Depending on what you are making, all measurements are for reference only. As a rule of thumb, 15 grams of fillings will require 15 grams of snow skin dough. In this illustration, this size is just about a bite size. However, you may want to reduce the size or up the size if you plan to cut it into smaller pieces. If you do not want to make the step, It will save a lot of time and efforts.

CONCLUSION
I love this recipe for its creativities and did not need to use the traditional moulds. As such, we can make moon cakes to one bite size and it will definitely be more welcoming by our guest. Due to the texture of snow skin, You can have any shapes depending on you skills and creativities. Children will definitely like this as it is cute looking.

It is a relatively short post and just sharing with the readers my adventures. Hope you like the post today. Have a nice day and cheers.

Share this:

Comments are closed
Your posts all look like so much fun! Pinned! Thanks for joining in #recipeoftheweek
thanks