
INTRODUCTION
When I posted my cheesy biscuit bites yesterday, one member in a Facebook Group (Ms. Flora Makan) offered me a recipe on Brazilian cheese bread, pão de queijo . She said this is a cheesy aroma bun that kids will like. Immediately she wrote down the recipe in the comment section and I truly appreciate her good intention..

In return for her graciousness, I have decided to prepare these well known Brazilian cheese bread ..Pao de Queijo is a very famous Brazil gluten free snack. Though the name is termed as bread or buns, it is prepared not using wheat flour but using tapioca flour or starch .In fact, other starches such as corn starch, potatoes starch, sago starch can be used as well. Unlike normal bread, it had a crusty exterior but springy and fluffy interior like all other cakes prepared using starches.

Due to its renown status, Wikipedia do have a very detail write up on its popularity, size, texture and preparation method. Per Wikipedia,

“Cheese buns, cheese breads, pão de queijo or originally known as chipá are a variety of small, baked, cheese-flavoured rolls, a popular snack and breakfast food in Brazil ( in the state of Minas Gerais), Argentina (in some regions) and Paraguay. Its origin is uncertain; it is speculated that the recipe has existed since the eighteenth century in Minas Gerais (Brazil), but it became popular throughout the country after the 1950s. Cheese buns are distinctive not only because they are made of cassava or corn flour, but also because the inside is chewy and moist. Its size may range from 2 cm to 15 cm (1 to 6 inches) in diameter and approximately 5 cm (2 inches) in height.

Pão de queijo are formed into small balls, around 3-5 centimetres in diameter. The cassava root produces a very powerful starch which is key to the size and texture of the pão de queijo; unlike other types of bread, the recipe calls for no leavening of any kind. Small pockets of air within the dough expand during baking and are contained by the powerful elasticity of the starch paste. One can knead pão de queijo in a mixer with a hook attachment or do it manually by hand. Once the mixture reaches a doughy consistency, it’s vital to roll it into a ball and either bake immediately or freeze it for later use. If left to rest, the dough will virtually liquidify. Regardless of whether the bread is made from freshly made dough, or with frozen dough prepared at a prior cooking session, the final pão de queijo will be the same size and texture.” (Source: http://en.wikipedia.org/wiki/Cheese_bun)

There are two versions of preparing this cheese buns. One is to lightly cook the tapioca starch and add eggs until it form a dough. This is the method that I am sharing with all. Another method is to use blender to blend all the raw ingredients and bake in cupcake cups.

WHAT IS REQUIRED
Recipe from: Ms. Flora Makan
Servings: About 12 buns

-
244 grams (2 cups) of tapioca flour
-
80 grams (1/3 cup) of water
-
80 grams (1/3 cup) of milk
-
100 grams (1/2 cup) of cooking oil
-
125 grams of parmesan cheese ( I used cheddar cheeses)
-
2 eggs
-
a teaspoon of salt
* Since measurement were given to me in cups, I will advise readers to use standard measuring cups if possible.

STEPS OF PREPARATION
-
Pre-heat the oven to 180 degree Celsius.
-
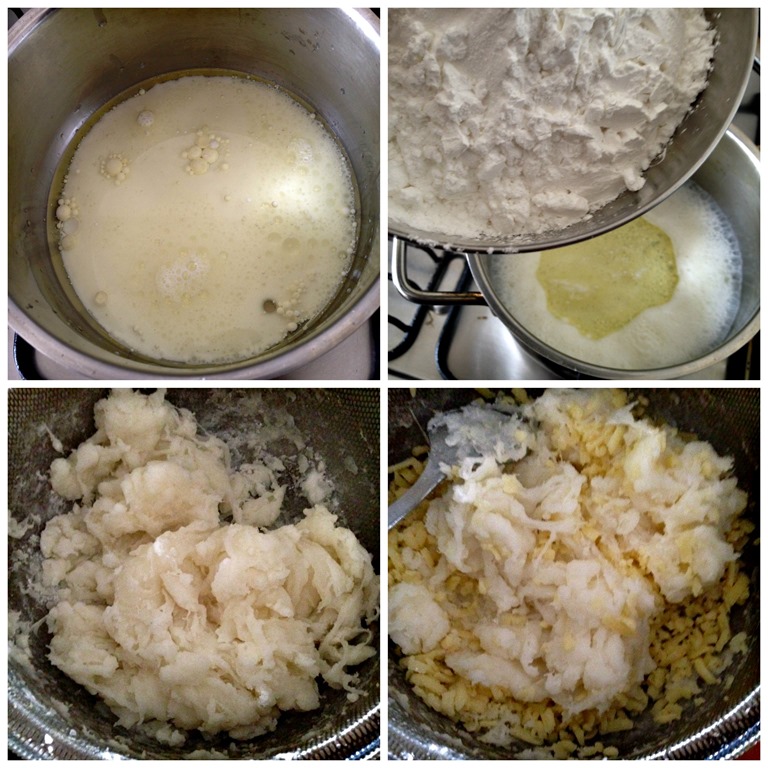
In a pan, put in all the liquid ingredients (water, milk and cooking oil) and salt, bring to boil. Once boiled, off the heat, pour the tapioca flour and stir until well combined. Don’t be alarmed by the lumps. Let it cool for about 15 minutes, add the parmesan cheese (or cheddar cheese). Stir until well mix.

-
Crack the eggs into the dough and transfer to a whisking bowl of a standing mixer. Beat the mixture until the mixture is smooth (about 5-10 minutes). If you do not have the mixer, you can use hand to manually “knead” the dough until the eggs were finally incorporated.
-
Once the dough is ready, divide the dough equally into 12 buns, shape round and place in the baking tray. Note that the dough can be rather soft, flour the work surface and your hand with additional tapioca or cassava flour to facilitate the shaping. Bake in the pre-heated oven of 180 degree Celsius for about 15-20 minutes on when the top is brown. In this process, you will witness the buns start to puff up.

-
The bread is best served warm when out of the oven as a snack.

CONCLUSION
Though there are many recipes on the web for this famous Brazilian Cheese Buns, but I like verbal recipes and I have to thank Ms Floral Makan for voluntarily providing this precious recipe of hers for me to share with readers. Thanks Ms. Flora Makan. Please do try preparing some of these cheesy Brazilian buns and see if it suits your taste buds.

Hope you like the post today. Cheers and have a nice day.

-
For more recipes, you can refer to my RECIPE INDEX (updated as at 28 July 2014) here and you can follow me at PINTEREST or visit the blog’s FACEBOOK PAGE to keep abreast of my future posts.
-
If you are a Pinterest user and you are interested to have more recipes, you can join or follow this Pinterest Board set up by me where there are more than 2600 recipes worldwide and pinned by various bloggers: FOOD BLOGGERS AND FOODIES UNITED PINTEREST BOARD.


Hi! Can I check if I can make any substitute with tapioca flour? 🙂
Hmmm, I strongly believe that other starches such as corn starch, potato flour may work as well
Dear Kenneth, does the other version requires eggs too?
Yes. I presume you can substitute egg with additional 50 g of milk
Hi Kenneth, when you say cheddar cheese, not the sliced type?
Can use morzerolla cheese?
Thanks.
Yes. You can
Dear Kenneth, the mixture become like cheese sauce after i knead using bread machine, any idea what happen. ..
possibly kneading too long. take out and add tapioca flour by hand knead until it is a pliable dough
Hi, can the dough be prepared and left in fridge to be used for baking the next morning?
Never try before and rather unsure.
Hi Kenneth, I have tried out the recipe and it was great! Just wondering if you have any suggestion to substitute the cheese with any other ingredient?
No cheese will be plain. How about some cocoa powder ?
Thanks for the suggestion I will try that out.
哦!看到了,之前一直找不到这英文版的,谢谢分享!
Hi, Kenneth I have tried today with cocoa powder and I add sesame too, taste good! Thanks!
Well done
Hi, thanks for the recipe! do these keep well In the fridge?
No, better do small batches